D of E ROUTE CARDS
bronze / silver / gold / overseas
Filling in route cards can be time consuming until you have had some practice but if you can get into the habit of referring to them at each stage of your journey they can help make sure you do not get lost and speed up your navigation.
Please click here to download a route card
All the information at the top of the card is pretty straightforward. The bit we are going to concentrate on is the section where you fill in the legs of your journey.
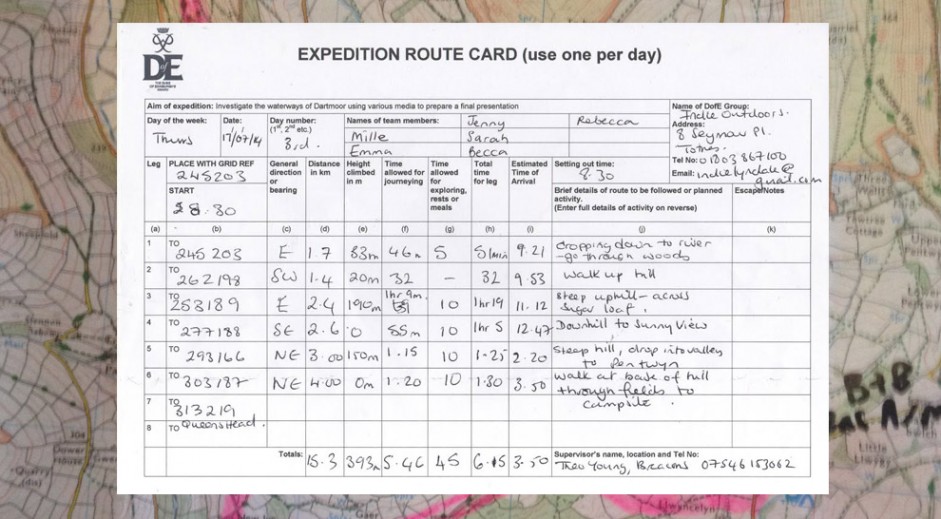
Legs
First you need to decide how long a leg should be and how many legs your journey should be broken into. Generally you don’t want to break your day into more legs than there are on one sheet when planning a bronze expedition. On Silver or Gold you might need to use more than one sheet per day. You can download a simplified continuation sheet for these extra legs by clicking on the links on the left.
Generally speaking a leg is a section of a journey which follows a certain path or feature or travels between two obvious landmarks or it could be a section of journey which essentially travels in one direction. So if you follow a stream, path or road then make this part just one leg. If you come to a junction and continue on the same path in the same direction do not make a new leg but if you turn off your path and follow a different path, road or stream for example then you need to start a new leg. If you are striking off across open ground and need to make a major directional change at some point then you should start a new leg when you change direction. Don’t make legs too long (no more than 2-3 kilometres)
The idea is: one person is navigating with the map and one holds the route card. When you arrive at the end of a leg, the one holding the route card should be able to glance at it and then at the landscape and say: ‘Yeah I’m pretty sure this is it, we should now go into the woods and follow the path.’ The one with the map can then confirm this. This might seem complicated but is actually quicker and more accurate than just using the map. A good navigator, using the map and the route card together will be less likely to get lost.
Direction
You should not need to use a compass when working out your general direction. Just use your judgement and write N, NE, E, SE, S, SW, W or NW. If you really want to make an accurate bearing place the edge of your compass along the path you are going to take with the arrow pointing in the direction you are walking then turn the bevel around so that the lines underneath the compass needle are lined up with the N-S lines on your map. Then read off your bearing. This is called map to land orientation and means you are now holding your map the right way around.
Distance
Use a piece of string or shoelace and measure it using the edge of your compass which corresponds to the size of map you are using. For example if using a 1:25,000 map (quite likely) measure out 1000m and mark your string with a pen. Then you can measure your leg using the string which will bend easily along the twists and turns of your route. Don’t be too accurate or you will be there forever.
Height climbed
The contour lines on your map are at 10m intervals so just count them up. If you go up and down then up again you need to add all the up together because you need to know how much height you have walked up as this will affect your walking speed.
Time allowed for journeying
Estimate the normal walking speed of your group. A fit person on flattish ground carrying only a small rucksack can walk at 5kmph. Taking into account the size of your rucksack and your fitness you will be travelling at around 2-4kmph. Use this formula to calculate your time for journeying then add 1 minute for every contour line you walk up. It is impossible to work out what your real walking speed will be until you have had a go at it. This is what only your practice expedition can teach you.
Time allowed for exploring, rests, meals etc
Exploring means doing the things you need to do to complete your aim. You should give yourself about three rest periods on top of this- probably two of 20mins and one of 30-40mins. If you are unsure give yourself more rest than you think you need then you might surprise yourself and get in early. Remember unless you have special dispensation you should be travelling for at least 50% of the day (3hrs for bronze, 3.5hrs for silver and 4hrs for gold).
Estimated time of arrival
Don’t fill in this column until you have finished working out all your legs and how long you think they will take. If you change your mind about something you will have to change everything in this column so leave it ’til last.